Sign in to your Godaddy domain registrar account
In the GoDaddy site, at the upper right, click Sign In.
Under Registered Users, click Sign In.
Under My Account, enter the Username or Customer # and Password you created when you purchased your domain from GoDaddy. Then click Sign In
If you don’t know your login information, reset your GoDaddy password or contact GoDaddy Support.
Go to your MX records to set up email
From the Domains pane of the My Products page, click DNS for the domain you want to verify.

The DNS Management page opens with the DNS records table.
Delete your old MX settings
First, delete the current MX records that send mail to your old email provider. After that, you'll add new MX records for your account.
In the Records table, scroll down the records with MX as the type.
Next to the first MX record, click the Edit icon.
From the open record, click the Delete icon.
Repeat these steps for all MX records in the Records table.
Don’t worry, you’ll add new ones in the next steps.
Set up your email by adding MX records for Gmail
At the bottom of the Records table, click Add.
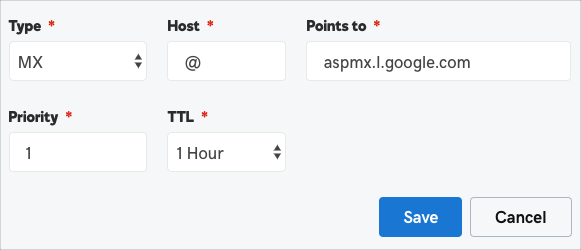
From the Type drop-down list, select MX.
In the Host Record field, enter @.
In the Points To field, enter ASPMX.L.GOOGLE.COM. Don’t include a period at the end of the record.
In the Priority field, enter 1.
Leave the default value in the TTL field.

Click Save
Your new record is shown in the Records table.
Follow these same steps to add the MX records shown in this table. Start from the top of the table and enter as many as you have room for. Don’t include a period at the end of the MX record.
| MX SERVER ADDRESS | PRIORITY |
|---|---|
| ALT1.ASPMX.L.GOOGLE.COM | 5 |
| ALT2.ASPMX.L.GOOGLE.COM | 5 |
| ALT3.ASPMX.L.GOOGLE.COM | 10 |
| ALT4.ASPMX.L.GOOGLE.COM | 10 |
Note: Each address is for a Google mail server, several servers are provided in case one becomes unavailable.

